Aug-2018
How to become a travel blogger

Have you ever wondered how to start your own travel blog? Don’t know where to start? I would like to share my personal tips about creating a website and turning it into a successful blog.
How to start your own travel blog
In 2013 I decided that I needed to log everything that I was doing while traveling. The constant e-mails I sent to family and close friends were nice, but I wanted to share it with more friends and people I knew. I thought there might even be people around the world that I don’t know who are interested in reading my stories. Perhaps it will help other travelers to choose where to go or how to get somewhere? I started thinking about a name for my online diary and possibilities that come with starting an actual online blog.
Years before I started That Wanderlust I had already played around a bit with making websites, but I had never started a website that actually had a purpose. It was just for fun before all this. I started out with software from CD’s that allowed me to build a website, but in 2013 I discovered WordPress. WordPress.com allows anyone to start a free blog. I started working on a simple template and soon decided it wasn’t enough. That’s when I discovered HostGator.com which is a necessary hosting service for powerful websites.
Where to begin?
The first thing I needed to do was to think about a name. A domain name. What do I want my blog to be called? It didn’t take very long before I came up with That Wanderlust. I went into the HostGator website and looked if thatwanderlust.com was still available and it was. Yay! My next step was to choose a hosting style. I needed a piece of land in the online world for That Wanderlust. I also needed a nice template to start with and from there I could start filling everything in. Within a month I had created a working travel blog and after a few months I even got in touch with sponsors! That Wanderlust quickly turned into a source for adventurous travelers and my aim is to keep on doing so.
Do you want to start your own travel blog and don’t know where to begin?
Step number 1: Choose a name
Google search
Think about your name wisely. It should be a name that fits you but also your readers. When they start searching in Google it should match the words they search for. If you want to name your blog for example TheScotAbroad it might only lead to Scottish visitors or people who actually want to go TO Scotland.
Also, have a look if your preferred blog name doesn’t already exist. Simply give your idea for the domain a quick Google search and see if anything pops-up in the results.
Don’t add destinations to the name
Be careful about adding destinations to your name, because you might want to move around and change destination. A TravelBlogFromTheMaldives might not be a good name if you decide to write about other locations as well. If you really only want to write about one country of course then go ahead and use the name of the place!
Keep it pronounceable
Keep it short and clear. Your readers should see the name and understand what your page is about. Whether it’s adventure, luxury or worldwide travel. If you meet someone and tell them your blog’s name they should be able to remember it and understand how to write it. Here I have to admit that some people confuse my blog’s name for “wonderlust” instead of “wanderlust” sometimes.
Step number 2: Register at hostgator
Once you’ve decided on your domain name you can register it through HostGator.com. You’ll always need to register a domain name and buy a hosting for it.
What is web hosting? Web hosting is buying a piece of land for your domain on the world-wide-web. It’s a place where your website gets storage and your hosting will make sure that your website runs well and that it can actually exist. It saves your images and information, the items you want to have on your page and inside your domain.
There are several hosting companies, but I have to admit that after trying a few of them I have been very loyal to HostGator since 2013. One of the reasons why I like HostGator it that they offer very good customer service. They have a live chat option that always gives me the quickest answers 24/7 to all my questions. Whether they were technical questions or about billing or anything else, they helped me personally through a chat. Another reason is that their customer portal is clear and easy for browsing. You can find what you need, even if you’re a newbie in creating a website and working with hosting.
Let me explain how to get yourself a HostGator domain and hosting.
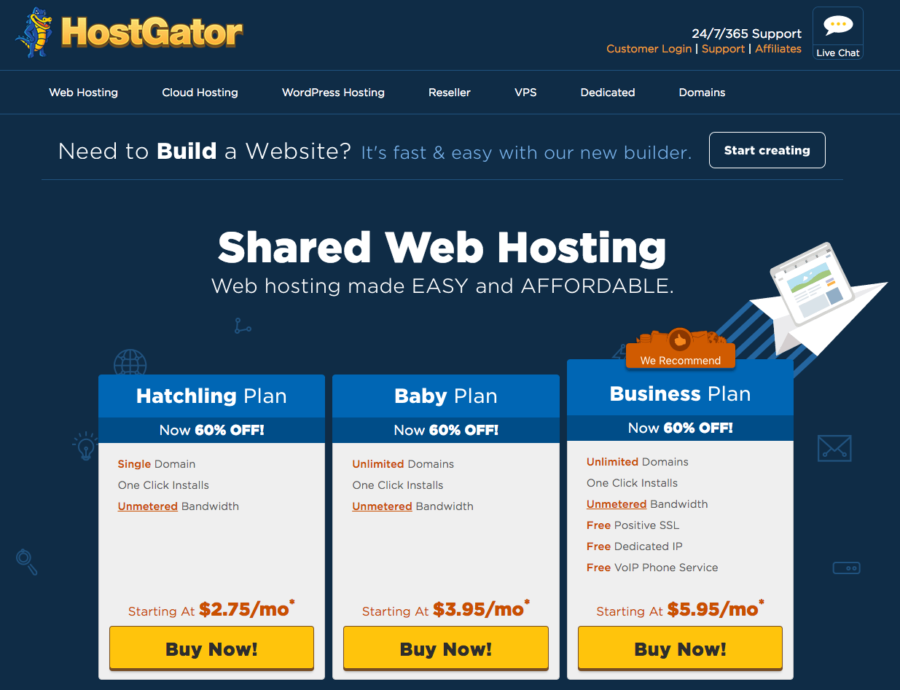
Pick a hosting plan
To start with, you have to pick a plan. I can recommend the Hatchling Plan for beginning bloggers who want to start with one website. If you’d like to register several domains, go for the Baby Plan instead.
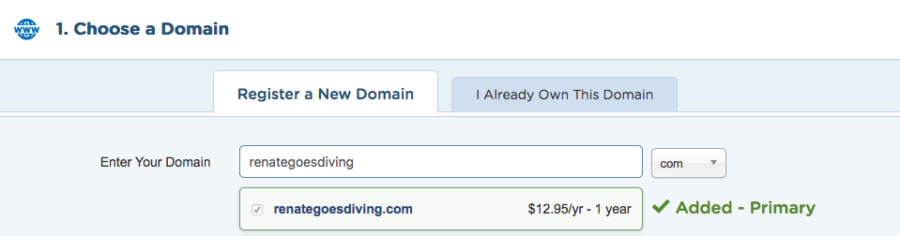
Register a domain
Once you’ve selected your plan you can register your new domain. Or, if you already have one you can continue from there. Just be sure to add Domain Privacy Protection on the bottom of the ‘Choose a Domain’ page. If you don’t, everyone can check your website details and find your personal details (such as your home address) in the future. You probably want those details to stay private so choose the Domain Privacy Protection.
Enter your billing info
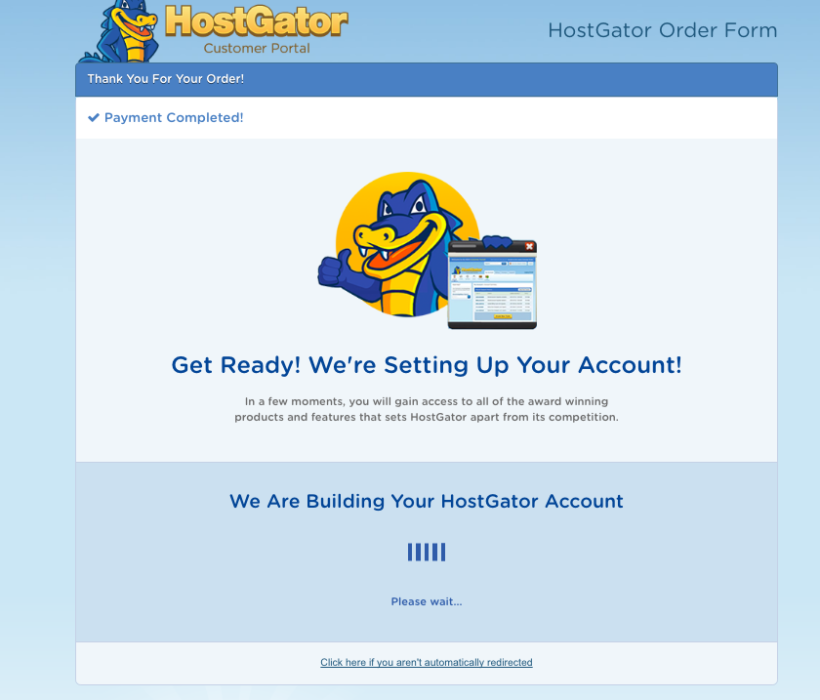
After you’ve decided on your domain and your plan you can start filling in your billing details. You can pay with either a credit card or even with Paypal. Once you’ve given your billing details it will load a screen and BOOM you’ve got a domain name with hosting!
After the payment is completed a screen will load where you can check your domain name and account details.
Click to start setting up your own HostGator domain and hosting account.
Step number 3: Install WordPress
Once you’ve got your HostGator account all set up you want to start installing WordPress. WordPress is the place where you will actually create your website and where you will see how it will look. You need both HostGator and WordPress. WordPress for the creative part as your blank canvas to start on and HostGator as your own art gallery.
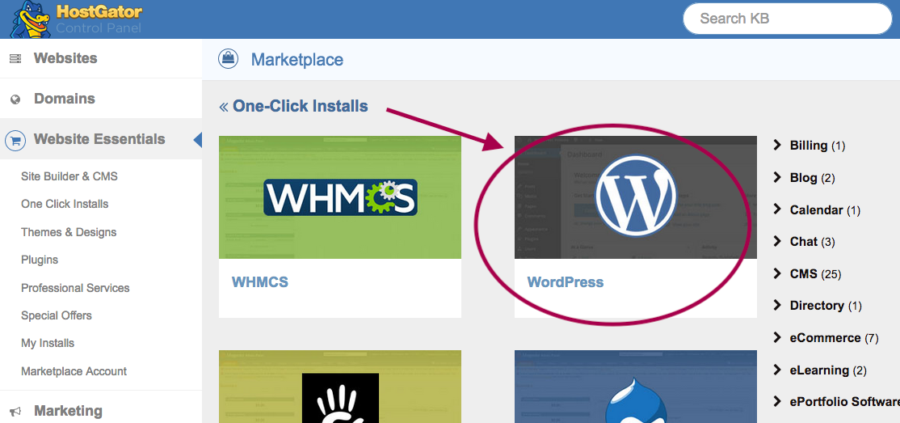
Log into your HostGator Customer Portal and click on Website Essentials in the menu bar. There you’ll find One-Click-Installs, click on it and select WordPress.
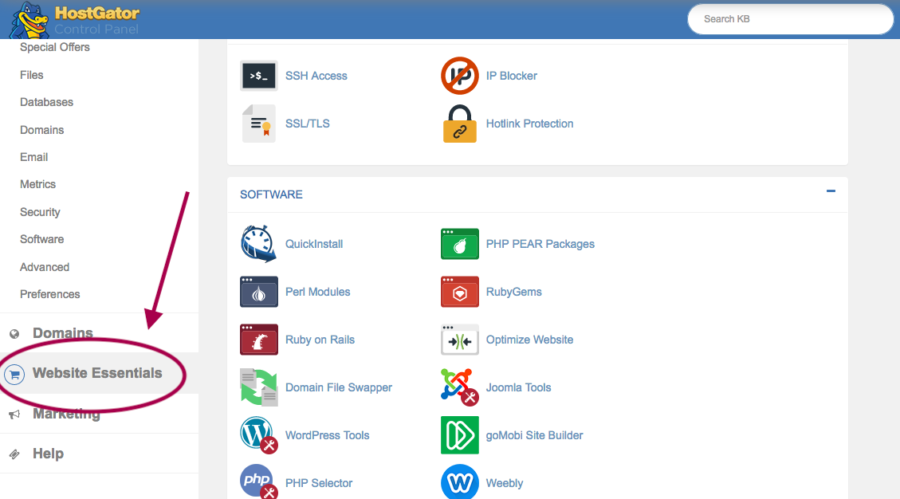
Select your domain and click next. Fill in the details and once you proceed WordPress and Hostgator will create a login for you. You’ll see a screen with your WordPress login details.
Usually to go into your own wordpress dashboard you simply need to browse your own domain name and add /wp-admin to it. E.g. www.renategoesdiving.com/wp-admin
Now you can start the creative part!
Step number 4: Select a theme
You’ll want a good-looking website, something gorgeous! Your ideas will make the websites content interesting, but you will also need a theme easy to navigate that looks good at the same time. A theme is an already designed website template that you can fill in with your content. There are free themes on WordPress available, but you might want to invest in one that it more unique. To browse the themes you need to be logged into your personal wp-admin and find Themes under Appearance in your sidebar. WordPress offers Premium Themes, but if you can’t find what you like I recommend you take a look at Theme Forest.
Step number 5: Install your plugins
Now you can start to install some plugins to make your website or blog even better. Plugins provide little apps for your page and make the overall user-experience better. Most are for free, but you can get a premium version if you want the best of a plugin. Below you can find a list of my favorite plugins.
my favorite Plugins
-
- Jetpack by WordPress.com
- Yoast SEO
- Akismet
- WP Super Cache
- Contact form 7
- Google Analytics for WordPress
- Comment reply notification
- All in one Favicon
- Mailchimp forms by mailmunch
- Fancier Author box
- jQuery Pin It Button For Images
- WP Instagram Widget
- Imsanity
Step Number 6: Create pages
Now you can start creating pages and posts. You can start with the basic, which are a few pages to start working with.
Here is an example of the basic pages:
- An about page where you tell your readers who you are and what you do and why.
- A blog page where all your blog posts come together for readers to browse through your recent posts.
- A contact page where your readers can find out how to contact you. Perhaps through a contact form?
- A home page which is the page that directs back to your website’s original home.
Whenever you feel ready to expand, you can think about more specific pages. Maybe even a collaboration page. Have a look at my menu bar to get an idea of the possibilities 🙂
Want to share your ideas about creating a new website? Leave your comment below and let’s share our tips and ideas!
*This post contains some affiliate links to help this website stay alive. However I would never endorse a product or service I did not actually use & believe in. Reader trust is much more important. If you have any questions about the companies in this article feel free to e-mail me. Learn More..
About Renate Rigters
Ever since I left my home country I felt at home at any other place I went to. I enjoy getting to know more cultures by talking to strangers and hearing their philosophy about life. Speaking with gestures when you can not find a shared language, finding places only the locals go to and learn about their customs and values. Hanging out with local people makes me happy. The experience of every new place is a step out of your comfort zone where I like to wander around until it feels like a second home.
- Web |
- More Posts(369)
comment this post
Thanks for the post. This would be beneficial especially to newbies starting out. I think you should be an experienced blogger.
Giving back is always gooD:)
Hi Pusat, thanks for your positivity. Cheers, Renate
Very Good post !
Great Content, awesome to read on.
If you need to book the cheapest flight donot wait any more. Visit our website and check out the exciting deals there.
Hi Matt, Thank you.
This is truly a great read for me!! Once again, thanks for the quality articles you post on your blog!! That is very interesting You definitely made my day with this awesome post. I am always searching for informative stuff like this! I will check here often for more cool stuff
I must say the Post was full of information with nice content, we are offering the flights tickets at much discounted prices and various complementary offers like extra luggage facilities, free lounge services, and many more feel free to dial the Aircanada Airlines Number and can have the further more info about your queries.